Getting Started with Google Jamboard
October 2021 – this post has gotten an update! Check out these Jamboard updates and some new ideas for how to use it in music classes.
I see the irony that my last post was about understanding your WHY in the classroom prior to determining your WHAT, and today I am starting another series on specific tech tools. However, with the school year beginning soon in many parts of the US, I know getting information about these tools will be helpful to many music teachers. With distancing recommendations, I believe technology will play a large role in any teaching situation, remote or in person. Regardless, I will do my best to provide a why first and then explain the what and the how.
Why: I want my students to feel they are a valued part of our musical community, whether they are participating in the classroom or at home. I want my students to feel their voice matters.

What is Jamboard?
Jamboard is one of the newer and lesser-known G Suite tools, but it’s one that I love and am excited to use this school year! Jamboard is a collaborative whiteboard that can be accessed by an app or web browser. The simplicity of the tool makes it great for education. Jamboard is a great way to have all students in your class share their voices.
A Jam can have up to 20 pages and 50 collaborators. On each page, users can add sticky-notes with text, insert images, and draw with a pen. The app has additional features. Through the Jamboard app you can insert content from your Google Drive, access your camera, and use various stickers. There are even assistive drawing tools for text, shapes, and objects!

Jamboard is a great tool for allowing a group of people to each share their thoughts and ideas. You could have several students collaborating and contributing to each page in a Jam, or you assign students their own pages to work on. It depends on the purpose of the activity.
Updates to Jamboard (added October 2021)
Since this blog post was originally published, there have been several great updates to Jamboard that make it even more useful in music classes! Here are a few worth noting:
- Custom Backgrounds: You can now create custom backgrounds for each Jamboard frame (page). This is good for not only making it look nice, but now you can include elements that cannot be moved or edited by students. For example, create a background image of a treble clef staff and have students use the circle shape to add notes to the staff. Students can add notes, but not move the staff.
- Version History: Jamboard now has version history, allowing you to see when changes were made and revert to previous versions. One thing to remember: in order to see who has made edits, users would need to be logged in to their Google accounts.
- Create Jamboard from Google Meet: Google Meet now has the capability to use Jamboard directly from the meet, and share it with users in the meet! Simply click on the “Whiteboarding” button in the Activities and you will be prompted to create a new Jamboard or select one from your Google Drive. This is a great way to engage particpants in a virtual meeting or class.
How You Can Use Jamboard in Music Classes
Getting to Know You
Each student gets one page in the Jam and can use a combination of text and images to introduce themselves to the class. When they are finished, students should read through the other pages to learn about their classmates. Remember, if you have over 20 students, you’ll need to create more than one Jamboard! In a large ensemble, creating one Jamboard per section could be a good option. Then provide viewable links to everyone so sections can learn about one another.
Co-Create Class Expectations
Use Jamboard for students to co-create class expectations. During virtual learning, students added their thoughts about expectations for microphones, cameras, the chat, and participation. The same activity could work for creating expectations for practicing, performances, or behavior on a trip. Jamboard allows all students to add their opinions on a topic and have their voices heard.
Bell Ringer
As class is starting students can respond to a question or prompt using Jamboard. Maybe you have a recording or video playing and ask students to add a sticky-note and write 2-3 sentences about what they heard. Or you have students answer a question related to something they learned during the last class, as a means of formative assessment. Bell ringers are great for getting students engaged in the beginning of class.
Exit Ticket
Similar to bell ringers, exit tickets gather quick information from students, this time at the end of class. You can find out what students retained from the lesson and get their thoughts on how well they understand the content covered. After an ensemble rehearsal, you might ask students to list which piece or specific measures they are still struggling with. It’s okay for exit tickets (and bell ringers) to be anonymous. You will often get more honest responses from students when this is the case.
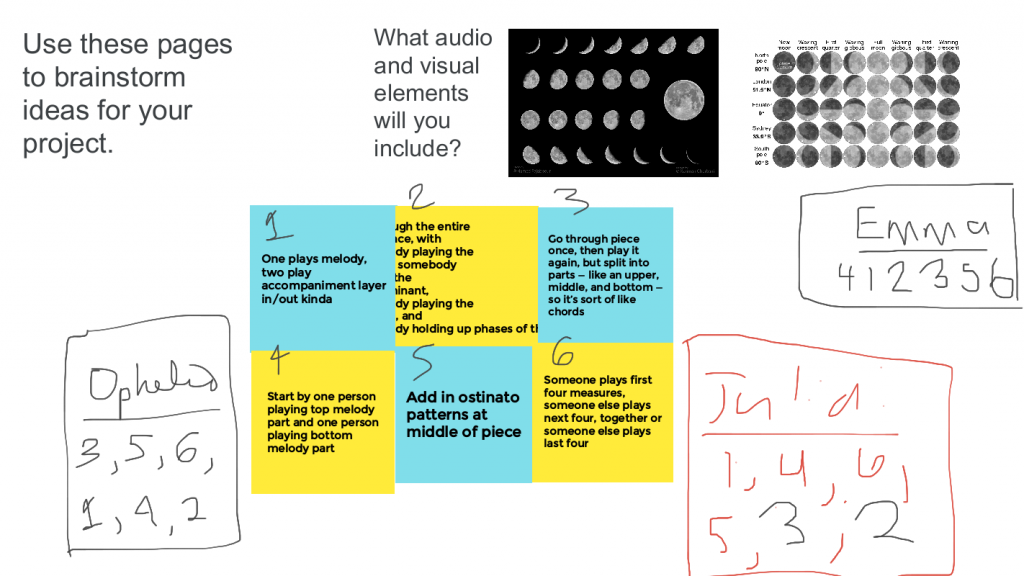
Collaborative Brainstorming
Jamboard has been a great tool for students to use when brainstorming for a project or activity. Students can add their thoughts using the sticky notes or text boxes, and they can also add images or draw on the slides. It truly provides a digital whiteboard experience that is easily saved, shared, and available on any device.
Reflection
One of my favorite Jamboard uses is for student reflection, specifically using “Roses, Thorns, and Buds.” This Jamboard contains three pages. The first one is for roses, where students add a sticky note discussing a success, a small win, or something positive that happened during class or rehearsal. The next page is for thorns, where students add a sticky note to identify a challenge they experienced, or something they need help with. On the last page, students describe a bud, a new idea that has blossomed, or something they look forward to learning more about.

Tips for Creating and Sharing with Jamboard
When creating a new Jamboard, start from Google Drive. Click “new” and then scroll down to Google Jamboard. You can also create a new Jamboard by typing jam.new in the URL bar of Google Chrome. All Jamboards are saved in Google Drive, or you can access them by going to www.jamboard.google.com. It’s also good to note that Jamboards can be downloaded as PDFs, and individual frames can be saved as an image file.
Once you have everything created, you will need to share it with students. Using the “Share” button, you can get a link to give students. Be sure you select the option so everyone with the link can edit, if you want students to contribute to the Jamboard. When the activity or assignment is over, you can use the same Share button to stop students from making any additional contributions. Simply change the access from “Editor” to “Viewer.”

The first time you use Jamboard with students, it’s a good idea to let them experiment with the tool first. They will be naturally curious and appreciate the opportunity to explore on their own. Then, when you use it as an assignment, be explicit with the instructions so students know exactly what you expect.
Interested in trying out Jamboard? Here are two to get you started!
Snowball Fight – check out the Snowball Fight template at Pass the Baton for a fun way to get students creating together.
Roses, Thorns, and Buds – Get a copy below! You can use it as is, or customize it to meet the needs of your class. Enjoy!
The form you have selected does not exist.
Looking for other great tech tools to use in the music room? Check out these posts:
- Flat: Music Notation for Google Docs
- Wakelet in the Music Room
- How to Create Quick, Stand-Alone Videos: Flipgrid Shorts
- Seven Google Add-ons and Extensions for Music Teachers