Using Google Slides in Music
March 2022 – This post has gotten a much-deserved update!
It’s no secret that I love all things Google. There are so many fabulous tools within Google Workspace for Education, and they seem to get better every day. One of the most versatile tools is Google Slides. I’ve called Slides my “island tool” – if I could only bring one ed-tech tool onto a deserted island, it would be Google Slides! (Don’t ask why I’ve thought about this!) Kasey Bell even refers to it as “Swiss Army Knife of G Suite.” It’s that great.

With all that said, here are some practical (and fun!) ways to use Google Slides in your music classroom.
Rehearsal Plans
One basic use of Google Slides for music teachers, especially ensemble directors, is to project rehearsal plans. I have one slide deck for each ensemble. Every rehearsal I add a new slide containing the rehearsal plan for the day and any relevant announcements. I project it on the board, so students know what to expect each rehearsal. While I have more detailed plans for myself in my planner (www.planbook.com is a life-changer!) it’s nice to have the basics all in one place.
To take things one step further, share the document with students (view only) so they can remember what we covered in rehearsal, find out what they missed in rehearsal, or see what is coming for future rehearsals.
And one more hint – use the Music Snippet (formerly Flat for Docs) add-on to include short rhythmic or melodic snippets in your rehearsal slides! You can find more info here: Music Snippet – Music Notation for Google Docs.


Collaborative Slides
Even
When using Google Slides collaboratively, it’s a good idea to create a title slide that include the instructions for the assignment and any expectations you have. When sharing the slide deck with students, ensure it’s set so anyone can edit. Determine if each student will work on their own slide, or if students will work together on slides. Also think about how students know which slide to contribute to – consider pre-assigning slides, assigning by slide number, or having students put their name on the slide they’ve chosen to edit.
How can you use collaborative slides in music classes? There are so many ways! Here are a few of my favorites.
Bell Ringers or Exit Tickets
Have students respond to a prompt upon entering (or right before leaving) the classroom. This could be a reflection on a recent performance, a response to a piece of music playing, or answering a question about what they learned in class.
Share Performance Practice
Have students record videos of themselves playing a piece of music. The students then upload the videos to their individual slides, adding a reflection or description as desired. Students can watch each other’s videos and leave feedback. (Note, adding videos to Google Slides is not currently available on mobile devices or tablets.)
Share Creative Projects
Following a composition project, have students take a picture of their compositions to add to their slide along with a description and maybe even a video of it being performed. Take this one step further by having students use the Music Snippet add-on to notate the composition directly in Slides! (Not familiar with the Music Snippet add-on? Check out this post: Music Snippet – Music Notation for Google Docs.)
Collaborative Slides – Outside Your School
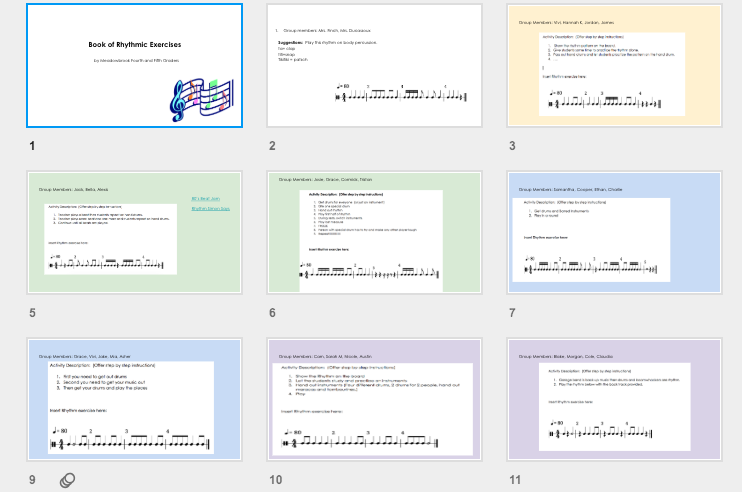
Another great thing about Google Slides collaborative experiences is that it doesn’t have to be limited to only your class. Consider sharing Slides with another class, or even another school! I had a great experience with this last spring, with blogger buddy Kathryn Finch. Kathryn’s 4th and 5th-grade students (in the Chicago suburbs) had been studying rhythmic writing and needed a culminating project that “meant something.”
My 5th-grade instrumental students (just outside Washington, D.C.) still had five weeks of school left and needed something fun to work on. Kathryn had her class create a book of rhythm exercises in Google Slides for my students to practice! Her students worked in groups to create their rhythms and come up with fun ways to practice them. The students then compiled their exercises into an ebook in Google Slides. The students in Chicago were excited to be writing something for someone, and the students in D.C. were excited to have something created just for them! It was a win-win situation.


To learn more about this project, check out this blog post Kathryn wrote: Transform a Composition Project from Teacher-Led to Student-Led.
Additional tips for setting up collaborative Google Slides
When sharing, make sure anyone with the link can edit. This is necessary for students to add their own slides to the document. If there comes a time you don’t want students to keep editing, simply change the share setting to view!
To share the document, consider sharing the link through your LMS, such as Google Classroom, Canvas, Seesaw, etc. You could also share the link as a QR code – smartphones, tablets, and some Chromebooks can read QR codes. To create a QR code, you just need to put the sharing link in any QR-code generator online.
Check the Version History (find this the in the File menu) to see what edits students are making and when. This is also a good time to talk to students about Digital Citizenship. You would never write on someone else’s paper, nor should you type on someone else’s slide. We are always respectful of our classmate’s work.
While students are working, you can monitor the entire class by switching to Grid View. This will allow you to see who is working and on which slides.


Interested in learning more about Google Slides? Check out these links:


5 Comments